
Audio and Video Player
for WordPress
Demo
If you want test the premium version of Audio and Video Player for WordPress, go to the following links:
Administration area: Click to access the administration area demo
Public page: Click to access the Public Page
Audio and Video Player with
AVP Steel Skin
- Allow playlist with multiple items
- Allow insert multiple audio and video players in your website
- Includes all available skins
- Allow selling the audio and video files from the media player
- Includes all future updates and improvements made to this version
- Includes 60 days of technical support
Preferred payment method: Pay with Paypal / Credit Cards - After payment you will be redirected to a direct-download page and the download link will be emailed to the payment address.
Print preview as audio player:

Print preview as video player:

Product Features
- Playback of audio files in MP3, WAV, WMA and OGG formats
- Playback of video files in MP4, OGG, WebM and WMV formats
- Allows subtitles in WebSTR format
- Support playlist
- Allows a link to associated information for each song
- Allows to enter a poster for videos
- Features handy controls to manipulate the medias during playback
- Allows the sale of files associated to media player
- Includes sales reports
- Available as WordPress plugin
- Numerous skins that may be acquired separately
Skin Features
- An Audio and video player skin with metal colors and stylized controls
- Buttons: play/pause, next, previous, fullscreen, subtitles, mute on/off
- Volume control
- Seek bar
- Allows associated information pages
- Displays the playlist
- Displays the song's elapsed time
- Recommended dimensions for audio mode. At least Width:480px Height: 65px
- Recommended dimensions for video mode. At least Width:480px Height: 300px
Demo available with Classic Skin only
Other Audio and Video Player's looks
- AVP Stylized Audio and Video Player
- AVP Ball Audio and Video Player
- AVP Button Audio and Video Player
- AVP PlayPause Audio and Video Player
- AVP Fine Audio and Video Player
- AVP Steel Audio and Video Player
- AVP Bar Audio and Video Player
- AVP Beau Audio and Video Player
- AVP Blue Audio and Video Player
- AVP Classic Audio and Video Player
Audio and Video Player details
- Screenshots and Video Tutorials
- Requirements and Installation
- Use Description and Tips
- Playlist and Resources
- Frequently Asked Questions
Audio and Video Player Interface

- The progress bar. Shows the playback progress. This bar enables us to move quickly to a new position (both forward and backward) in the file's playback, just by clicking on the desired position.
- The previous track button enables us to go to the preceding audio file.
- The play/pause button.
- The next track button. Allows us to go to the next file of playlist.
- The fullscreen button. Allows us to set the video in fullscreen mode.
- The subtitle button. Allows us to select an subtitle for the video.
- Time indicator. Shows the elapsed time since file playback started and video duration.
- The mute button sets the volume to on/off.
- Equalizer. The equalizer shows in an approximate way how the audio volume behaves during playback.
- The playlist. Allow us to select the audio file to playback. The audio being played it is displayed in a different color in the playlist. The plus simbol front item on playlist allows us to go to a webpage with additional video information.
- Pay now button.
Insertion process screenshots


Audio and Video Player Requirements

![]() The Audio and Video Player is distributed as a WordPress plugin, so is required to use WordPress as content management system for the website development.
The Audio and Video Player is distributed as a WordPress plugin, so is required to use WordPress as content management system for the website development.
Audio and Video Player Installation
The Audio and Video Player is distributed as a WordPress plugin:
- Download and unzip the plugin
- Upload the entire audio-and-video-player/ directory to the /wp-content/plugins/directory
- Activate the plugin through the Plugins menu in WordPress
To install a new media player skin:
- Download and unzip the skin file.
- Upload the skin directory to the "skins" directory inside /wp-content/plugins/audio-and-video-player
Inserting the Audio and Video Player in your website
Audio and Video Player has an extensive set of configuration variables that provides great flexibility to this plugin. Media players are first generated on the Audio and Video Player page. Then they are to be inserted into your blog directly from the Post/Page editing interface. Generating media players in the same environment will facilitate editing of media players and inserting of the same player on different pages of your website or blog.
Creating the Audio and Video players
On the HTML5 Audio and Video Player page, you will see the already generated media players and the button to create a new player. To create a new media player just select the type of player: Audio or Video - and press the button "Create new media player". To edit an existing media player, just select it in the list of existing players and press "Edit media player".
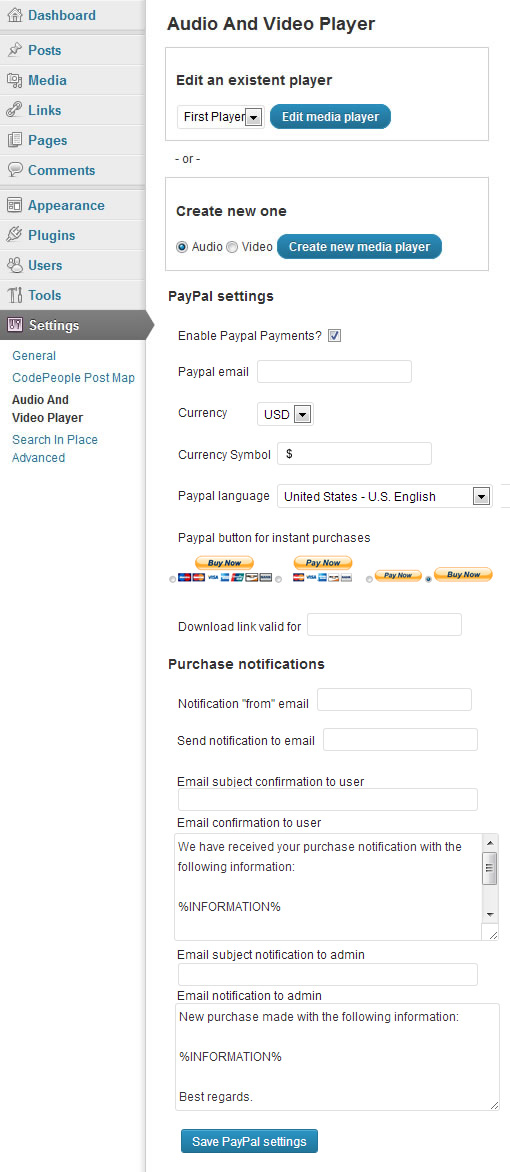
Figure 1. Page of Audio and Video Player on settings. Select the media player to edito or create new one. For sell through "Audio and Video player", it is required complete PayPal settings.
Configure the PayPal account
Enable Paypal Payments?: Enable the PayPal account.
Paypal email: Enter the email associated to the PayPal account.
Currency: Select the currency for selling.
Currency Symbol: Enter the currency symbol.
Paypal language: Select the PayPal interface's language.
Paypal button for instant purchases: Select the PayPal button to use in website.
Download link valid for: Enter the number of days to restrict the download link.
Notification "from" email: Enter the email address to use as "from" attribute in the notification emails.
Send notification to email: Enter the email address to receive the sales notifications.
Email subject confirmation to user: Enter the subject of notification emails sent to the buyers.
Email confirmation to user: Enter the content of notification emails sent to the buyers ( don't remove the text %INFORMATION%, it will be replaced by product's information)
Email subject notification to admin: Enter the subject of notification emails sent to the seller.
Email notification to admin: Enter the content of notification emails sent to the seller ( don't remove the text %INFORMATION%, it will be replaced by product's information)
Create or edit a player
After select a media player to edit or create a new one, a new screen allow you to enter the player's features.
Interface of setup wizard
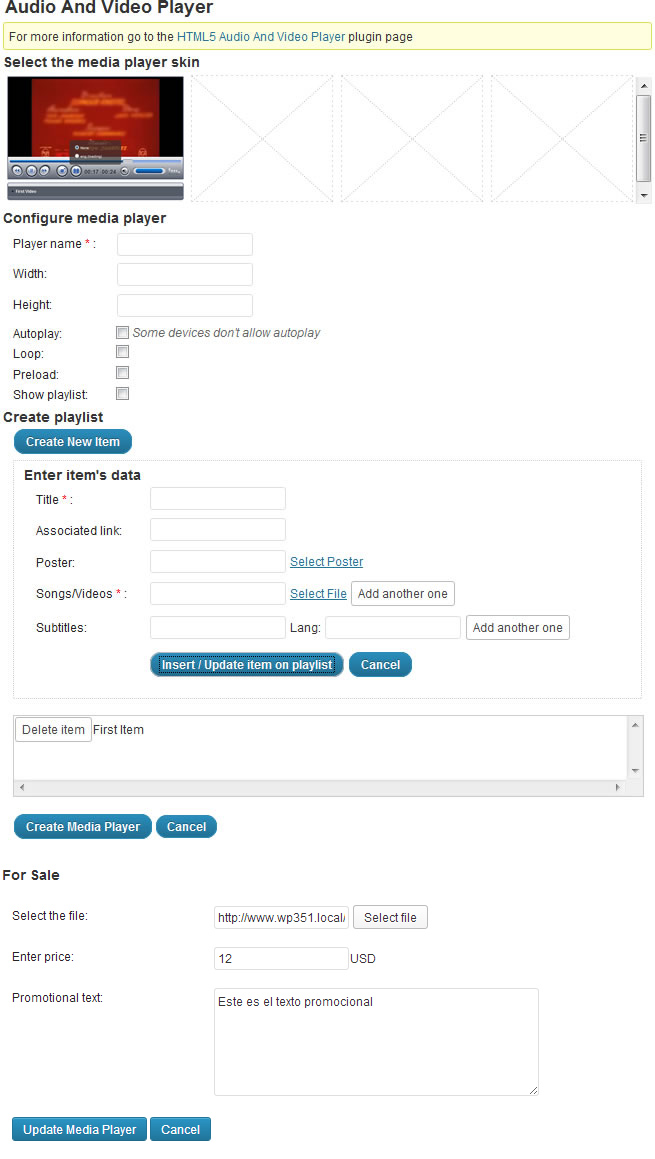
Figure 2. Configuring an Audio and Video Player.
Select the skin: the first skin will be selected by default.
Player name: mandatory field that will allow to identify the media player for the insertion process on your website.
Width: Enter the width of the media player. Under the field you will see the values recommended for the selected skin. Every skin has a different recommended value.
Height: Enter the height of the media player. Under the field you will see the values recommended for the selected skin. Every skin has a different recommended value.
Autoplay: Mark the checkbox if you want your media player to initialize in "ON" mode.
Note: Some devices do not support autoplay.
Loop: Allows cyclical playback of the playlist. This feature may be limited on devices that do not support autoplay.
Preload: Allows you to pre-load media files to streamline the playback process. Some mobile devices do not allow file preload.
Show playlist: Displays or hides the playlist.
To create a playlist please press "Create New Item". The data associated with a playlist item are:
Title: mandatory field that will identify the item in the playlist.
Associated link: URL to a web page with information associated to the item.
Poster: URL to an image associated to the item, only available with the video type media player.
Songs / Videos: mandatory field where you enter the URL to the media file. Browsers support different multimedia file formats, therefore it is advisable to enter different formats for the same item, enabling each browser to select the file format that it supports.
Subtitles: Enter the URL to the subtitle file and the subtitle language.
After entering all data item press "Insert / Update item on playlist"
For Sale
Select the file: Select the file for sale.
Enter price: Enter the file's price.
Promotional text: Enter a promotional text.
Inserting the Audio and Video Player on your post
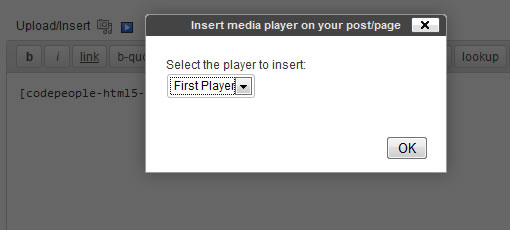
To insert the media player in your website go to the editing of posts / pages and click the icon for HTML5 Audio and Video Player in the web editor. This will load a window where you will be able to select your media player. After inserting the media player save the changes on the website.

Figure 3. Insert Audio and Video Player.
The sales report
For checking the sales reports, press the menu option "Sales Report" and select the interval of time for checking. The sales report displays the list of sales in the selected interval and the total amount distributed by currencies.
Formats of Media files supported by Audio and Video Player
The audio files supported by the music player are: MP3, OGG, WMA, WAV.
And the video files are: MP4, OGG, WebM and WMV. Audio and Video Player allow to display subtitles in WebSTR format.
How to create the playlist
The playlist is a simple list <UL> but with special values on <LI> tags.
A demo of an usual playlist is below
<ul id="playerid-list" style="width:640px;"><li value='{"poster":"media/poster.jpg", "source":[{"src":"media/video.mp4", "type" : "audio/mp4"}, {"src":"media/video.ogg", "type" : "audio/ogg"}], "track" : [{"kind" : "subtitles", "src" : "media/subtitle_en.srt", "srclang" : "en"},{"kind" : "subtitles", "src" : "media/subtitle_sp.srt", "srclang" : "sp"}]}'>
Playlist Item
</li>
</ul>
Frequently Asked Questions
This questions are related with the Audio and Video Player, if you want to read the questions about another product, go to the product's page or the FAQ section in the main menu at top of the web page.
Select a question to access to the answer.
- How I know about the new skins for media player?
- Why is possible to enter more than one media files for each item?
- I have multiple subtitle files for different languages. Is possible to use all of them?
- How it is possible to sell all files of album?
- What audio formats are supported by each browser?
- What video formats are supported by each browser?
- Are included all skins with the plugin?
Answers
How I know about the new skins for media player?
The skins list is loaded from our website, so you always have access to the actualized skins list.
Go to the questions listWhy is possible to enter more than one media files for each item?
The browsers support different formats of audio and video, so it is recommended to enter all disposable files format for each item, then the browser selects the corresponding format.
Go to the questions listI have multiple subtitle files for different languages. Is possible to use all of them?
Yes of course, press the "Add another one" button and enter the data related to the new subtitles.
Go to the questions listHow it is possible to sell all files of album?
If you want to play some files through the media player, but sell the complete album. You should enter a zipped file (with all files of album) in the box "Select the file" of "For Sale" section.
Go to the questions listWhat audio formats are supported by each browser?
The audio formats supported by each browser, can be checked in the following link:
http://www.w3schools.com/html/html5_audio.asp
Go to the questions listWhat video formats are supported by each browser?
The video formats supported by each browser, can be checked in the following link:
http://www.w3schools.com/html/html5_video.asp
Go to the questions listAre included all skins with the plugin?
The free version of plugin includes only the Classic Skin. The premium version of plugin includes all skins. If you have purchased the premium version of plugin some time ago, and does not includes all the skins, use your download link to get a version of plugin with all available skins.
Go to the questions list